Date Masamune: The One-Eyed Dragon
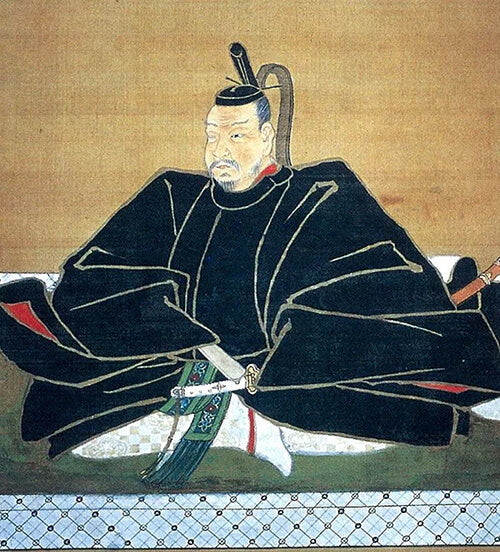
One of the most fascinating martial stories of the Japanese feudal age was the war between the Masamune and Hatakeyama clans. Both were famous samurai families who supported opposite sides of the shogunate. Follow along as Swords of Northshire details the escalating tensions, kidnapping, and subsequent battle that took place. Ready to dive in? Read on here!
Who Was Date Masamune
Masamune was a hot-blooded and aggressive man and had been this way since childhood. He lost the use of his right eye as a child after catching a disease, and when a senior member of his clan pointed out that an enemy could grab it fighting him, Masamune ripped it out himself. This story, combined with his aggressiveness is how he gained the nickname the One-Eyed Dragon of Oshu.
Date Masamune’s Conquests

One of the victories that put Masamune on the map was a battle in 1589. Masamune bribed a significant Ashina retainer to rebel, but betrayed him and pursued him with a large army to the Ashina headquarters at Kurokawa. They fought at Suriagehara, and Masamune demolished the Ashina who were forced to flee. Masamune showed no mercy. He had cut off their escape route by destroying the bridge crossing the Nitsubashi River, which meant the fleeing men either drowned or were slaughtered.
After this victory, Masamune was ordered to work with Toyotomi Hideyoshi and aid him in the siege of Odawara castle. Hideyoshi was essentially the ruler of Japan, so Masamune was obligated to help — even if he didn’t want to. In a bid to ensure he was on the winner’s side, Masamune waited for his spies to inform him of the likely winner before joining the battle.
Because of his delayed arrival, Hideyoshi didn’t offer Masamune his full respect, a divisive action in the honor-bound Japanese society. Because of Hideyoshi’s disrespect, Date Masamune chose to work with Tokugawa Ieyasu when he fought against the Toyotomi loyalists. He helped Tokugawa establish his own Shogunate, and gained a lot of power and influence in return.
Masamune & Hatakeyama At Odds

Because of the political machinations common during this period of Japanese history, tensions between the Masamune and the Hatakeyama were always high. But, eventually, they began to get out of hand. Yoshitsugu, lord of the Hatakeyama, attempted many times to achieve peace between the two clans, but the hot-blooded Date Masamune refused every time.
After many failures at a peace treaty, Yoshitsugu reached out to Masamune’s father, Terumune, to try and mediate the situation. The two men ate together, and the next day Yoshitsugu came to visit Terumune again in order to thank him for the meal. Unfortunately, this was a trap, as once he arrived, Yoshitsugu kidnapped Terumune instead. When Masamune discovered that his father was abducted, he flew into a rage typical of his One-Eyed Dragon title, gathered an army, and chased after Yoshitsugu.
Showdown With The Kidnappers
The Masamune clan found the kidnappers at Abukuma River. They could have slaughtered them all there, but Yoshitsugu was holding Terumune hostage and the rest of the Masamune clan feared for his safety. Terumune shouted for his son to fire on the Hatakeyama, but Date Masamune hesitated to attack. In the confusion, his father was killed and Yoshitsugu managed to escape. An enraged Masamune, went to war with the Hatakeyama.
When the war began, it wasn’t just between the Masamune and the Hatakeyama. The One-Eyed Dragon was facing every single one of their allies, including the Ashina, Soma, Satake, and many other samurai factions.
Samurai Vs. Samurai
Hatakeyama’s allies established an army of 30,000 men against the much smaller Masamune force of only 7,000 at a fort in his possession. Date organized his force into a defensive position around the fort in an effort to stave off the invading forces. Unfortunately, things didn't go as planned for him. The Hatakeyama quickly took control of three of his four fortresses, and one of Masamune’s most important retainers was killed in a duel with a Hatakeyama foe.
Date Masamune attempted to defeat the enemy forces at Hitadori bridge, but was forced to retreat back to Motomiya castle. Masamune and his army were sure this was the end. They were vastly outnumbered, and they’d lost the advantages they once had. Every chance they had to turn the tide of the battle failed.
Survival of the Fittest

It was supposed to be an easy win for the Hatakeyama, but the next day had many surprises in store. Instead of finally crushing their enemies, the Hatakeyama forces did not advance. In fact, a large portion of the army packed up and went home because they were needed to defend their own lands from invaders. The rest of the allied force was so dismayed by this, and they retreated as well. Miraculously, Date Masamune had managed to survive a sure defeat, and he took advantage of his survival for revenge against the Hatakeyama forces and their allies in the years to come.
Date Masamune’s Tactics
The One-Eyed Dragon never stopped being aggressive, even as he got older. There are stories of him ordering his soldiers to fire at their own forces in order to motivate them to fight harder. He also had no qualms about taking out generals and leaders in the midst of battle to destroy the morale of opposing soldiers. Sanada Yukimura was one famous samurai that Masamune defeated on the field of battle. With Sanada’s death, the rest of his soldiers surrendered.
Standing Out Among the Rest
He was an unusual warrior, especially within a society that respected the code of Bushido and the honor of samurai above all else. Many other samurai were critical parts of Japanese history, but none had the fire and rage that simmered within Date Masamune.
If you’re interested in learning more about Japanese history, culture, and figures, like Masamune, explore the Swords of Northshire blog today!
Best Sellers
- Regular Price
- from $199.99
- Sale Price
- from $199.99
- Regular Price
-
- Unit Price
- per
- Regular Price
- from $319.00
- Sale Price
- from $319.00
- Regular Price
-
- Unit Price
- per
- Regular Price
- from $219.00
- Sale Price
- from $219.00
- Regular Price
-
$0.00
- Unit Price
- per
- Regular Price
- from $649.00
- Sale Price
- from $649.00
- Regular Price
-
- Unit Price
- per
- Regular Price
- from $339.00
- Sale Price
- from $339.00
- Regular Price
-
- Unit Price
- per
- Regular Price
- from $269.00
- Sale Price
- from $269.00
- Regular Price
-
- Unit Price
- per
- Regular Price
- from $239.00
- Sale Price
- from $239.00
- Regular Price
-
- Unit Price
- per
- Regular Price
- from $359.00
- Sale Price
- from $359.00
- Regular Price
-
- Unit Price
- per
- Regular Price
- from $539.00
- Sale Price
- from $539.00
- Regular Price
-
- Unit Price
- per
- Regular Price
- from $384.00
- Sale Price
- from $384.00
- Regular Price
-
- Unit Price
- per
